Declaration:
This is nothing but a log of my experiments. There may be a correct/standard way of resolving this problem. But, here, I am presenting my own experiment and a possibility on this.
Introduction
This article demonstrates sending ICMP traffic from a simulated ns-3 node to a Real Host over a real channel without using real, active wired ether network hardware. The reason for avoiding to use a real network hardware for ns-3-FdNetDevice experiment is: it requires a promiscuous mode and bringing a real networking hardware to a promiscuous mode may affect some of the other running applications.
Particularly, trying to use FdNetDevice along with a WiFi Ethernet Device will raise a lot of issues [6], and simply it may not work. (Further, even a web browser will stop functioning, in case, if we try to use a WiFi WiFi Ethernet hardware). In addition to that, there are some risks in bringing a WiFi Ethernet card to promiscuous mode.
So, the main scope of this experiment it to ping a remote WiFi host from a simulated ns-3 node which running in a WiFi laptop; where the remote WiFi host and the WiFi laptop are connected by means of a WiFi Access Point. So, out intention is to make it work without bringing the laptop’s WiFi Ethernet card to promiscuous mode.
Risks in Bringing a WiFi Ethernet Card to Promiscuous Mode
The common problems that one may face if they use a WiFi Ethernet card in promiscuous mode are :
- Performance degradation: Promiscuous mode can significantly degrade the performance of a WiFi network, as the card is now processing all traffic on the network, not just the traffic that is addressed to it. This can lead to slower speeds, dropped packets, and other problems.
- Security risks: Promiscuous mode can also pose a security risk, as it allows anyone with access to the card to see all traffic on the network. This includes sensitive data such as passwords, credit card numbers, and other personal information.
Promiscuous mode can conflict with other running network applications on a computer in a few ways:
- Data corruption: If two or more applications are trying to read the same network packet at the same time, it can lead to data corruption. This is because the packets may be modified or even dropped.
- Performance degradation: As mentioned earlier, promiscuous mode can significantly degrade the performance of a WiFi network. This is because the card is now processing all traffic on the network, not just the traffic that is addressed to it. This can lead to slower speeds, dropped packets, and other problems.
- Security risks: Promiscuous mode can also pose a security risk to other running network applications. This is because it allows anyone with access to the card to see all traffic on the network, including traffic that is intended for other applications. This could potentially allow an attacker to steal sensitive data or even take control of the application.
Some specific examples of how promiscuous mode can conflict with other running network applications:
- Antivirus software: Antivirus software often uses promiscuous mode to scan for malicious traffic on the network. If another application is also using promiscuous mode, it can interfere with the antivirus software’s ability to scan the network.
- VPN software: VPN software uses a secure tunnel to connect to a remote network. If another application is also using promiscuous mode, it can potentially see traffic that is being sent through the VPN tunnel. This could potentially compromise the security of the VPN connection.
- File sharing applications: File sharing applications often use promiscuous mode to listen for incoming file requests. If another application is also using promiscuous mode, it can potentially see traffic that is being sent to the file sharing application. This could potentially allow an attacker to steal files that are being shared.
Ns-3 Emulation Feature
The emulation feature refers to the capability of ns-3 to emulate real-world network behaviors and environments. It allows researchers and developers to simulate and study the behavior of network protocols and applications in a controlled, virtualized environment that closely resembles real-world scenarios.
Emulation feature in ns-3 aims to provide a higher level of realism compared to purely analytical or theoretical models by incorporating actual network software and hardware components. It allows for the simulation of complex network environments, including the behavior of routers, switches, and other network devices.
Key features of ns-3 emulation include:
- Integration with real network stacks: ns-3 can interface with real-world network stacks, such as the Linux kernel networking stack, to provide accurate emulation of network protocols and behaviors. This allows researchers to evaluate and test their protocols and applications in a more realistic environment.
- Emulated devices: ns-3 provides emulated devices that mimic the behavior of real devices. These devices can be configured to emulate specific characteristics such as packet loss, delay, bandwidth limitations, and queuing mechanisms.
- Integration with external software and hardware: ns-3 allows for the integration of external software and hardware components, enabling the simulation of interactions with external systems and devices.
- Realistic traffic generation: ns-3 supports the generation of realistic network traffic patterns, including the emulation of application-level protocols and traffic flows.
By utilizing the emulation feature in ns-3, researchers and developers can gain insights into how their network protocols and applications perform in real-world scenarios. It helps in evaluating the effectiveness and efficiency of various network designs, algorithms, and configurations before deploying them in real networks.
File Descriptor (FD) NetDevice
In the ns-3 network simulator, a File Descriptor (FD) NetDevice is a type of network device that allows the simulation of network communication over file descriptors. It is primarily used for inter-process communication (IPC) simulations or scenarios where network traffic is exchanged through file descriptors instead of physical or virtual network interfaces.
The FD NetDevice acts as a virtual network device that reads and writes data to and from file descriptors. It is typically used when simulating network protocols or applications that communicate through pipes, sockets, or other file descriptor-based mechanisms.
With the FD NetDevice, you can create a network topology where the network traffic flows between ns-3 simulations and external processes or components that communicate via file descriptors. This enables the simulation of complex network scenarios involving interactions with external systems or emulating specific IPC mechanisms.
To use the FD NetDevice in ns-3, you would typically create instances of this device in your simulation script, configure the relevant parameters (such as the file descriptors to be used), and connect them to other network nodes or devices as necessary. The FD NetDevice provides an interface for sending and receiving packets, allowing you to simulate the flow of network traffic over file descriptors in your ns-3 simulations.
More Information can be found on the official documentation page at [1].
Common Problem
It is possible to send packets from a ns-3 node to a real network node and similarly, it is possible to receive a packet at a ns-3 node, which was sent from a real network node. This is usually done through the special ns-3 network device called FdNetDevice. But often ns-3 users[6] find some issues while doing such simulations.
For example, if we try to run one such example simulation available in ns-3, namely fd-emu-ping.cc, probably it will fail because of several reasons. To understand them, first we may try to understand the instructions given at the top comment section of ‘fd-emu-ping.cc’
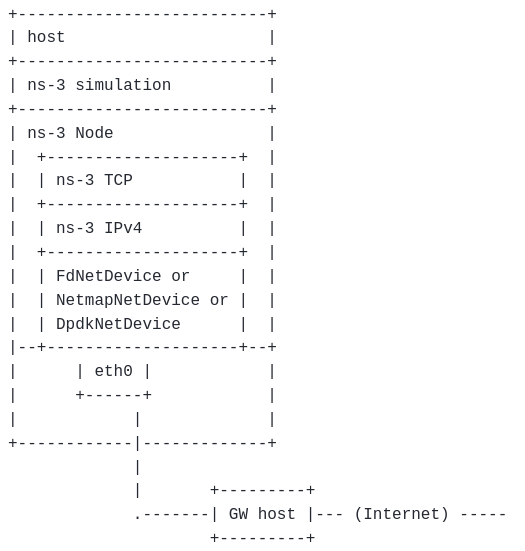
You will find the following architecture diagram at the top comment section of ‘fd-emu-ping.cc’
Allow ns-3 to ping a real host somewhere, using emulation mode
The following are the instructions at the top comment section of ‘fd-emu-ping.cc’ to use that example:
- You need to decide on a physical device on your real system, and either overwrite the hard-configured device name below (eth0) or pass this device name in as a command-line argument
- If you run emulation in dpdk mode, use device address (eg. 0000:00.1f.6) as device name. This address can be obtained by running `lspci`
- The host device must be set to promiscuous mode (e.g. “sudo ifconfig eth0 promisc”)
- If you run emulation in netmap or dpdk mode, you need before to load the netmap.ko or dpdk modules. The user is in charge to configure and build netmap/dpdk separately.
- Be aware that ns-3 will generate a fake mac address, and that in some enterprise networks, this may be considered bad form to be sending packets out of your device with “unauthorized” mac addresses
- You will need to assign an IP address to the ns-3 simulation node that is consistent with the subnet that is active on the host device’s link. That is, you will have to assign an IP address to the ns-3 node as if it were on your real subnet. Search for “Ipv4Address localIp” and replace the string “1.2.3.4” with a valid IP address.
- It will need to configure a default route in the ns-3 node to tell it how to get off of your subnet. One thing you could do is a ‘netstat -rn’ command and find the IP address of the default gateway on your host. Search for “Ipv4Address gateway” and replace the string “1.2.3.4” string with the gateway IP address.
- Give root suid to the raw or netmap socket creator binary. If the –enable-sudo option was used to configure ns-3 with ns3, then the following step will not be necessary.
$ sudo chown root.root build/src/fd-net-device/ns3-dev-raw-sock-creator
$ sudo chmod 4755 build/src/fd-net-device/ns3-dev-raw-sock-creator or (if you run emulation in netmap mode):$ sudo chown root.root build/src/fd-net-device/ns3-dev-netmap-device-creator
$ sudo chmod 4755 build/src/fd-net-device/ns3-dev-netmap-device-creator - If you run emulation in dpdk mode, you will need to run example as root.
If we run the script ‘fd-emu-ping.cc’ to test the working of FdNetDevice by sending some packets from a ns-3 node to a real network node, mostly it will fail at the first time. To make it work, we have to do the following :
- Setting the correct physical network device name (usually it will be a physically installed wired ethernet device name such as ‘eth0’ ).
- Setting the remote IP address of the real node which we want to ping (usually it will be like “192.168.1.7” as per the convention that is used in your network )
- Setting the local IP address of the ns-3 node from which the ping application is running (usually it will be like “192.168.1.101” to follow the same convention that we used in your network)
- Setting the local gateway IP address ( Usually, it will be like “192.168.1.1”, which is set at the hub/switch/router of your network)
If we try to run the simulation ‘fd-emu-ping.cc’ without active wired ethernet hardware, then mostly it will fail. In other words, if we try to set up it to run through the wireless ethernet card, mostly it will fail. The main reason is : this simulation will expect the network device in promiscuous mode[5], but wifi ethernets could not be used in standard/traditional promiscuous mode.
So, to make it work we are setting a virtual Linux (VirtualBox) client inside another host Linux(Native Debian Install).
In fact, we are trying to bring the virtual networking hardware of the Virtual Guest into promiscuous mode and able to run the simulation under that virtual machine. In other words, a virtual ns-3 node that is running on the Virtual Guest Linux will be able to send packets to the Real Linux Host machine.
Experimental Setup
For installing Linux under VirtualBox, one may follow the below article:
Installing an old Linux under VirtualBox and using Shared Folders.
For installing ns3 under virtual Linux installation, one may follow a procedure like the below one :
Installing Aquasim & Aqua3D on an old Linux under VirtualBox
The Experiment
First, bring the virtual networking device of the Virtual Linux Guest to promiscuous mode.
The following is the modified simulation script that will run without using real network hardware:
The Network Setup
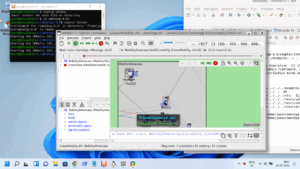
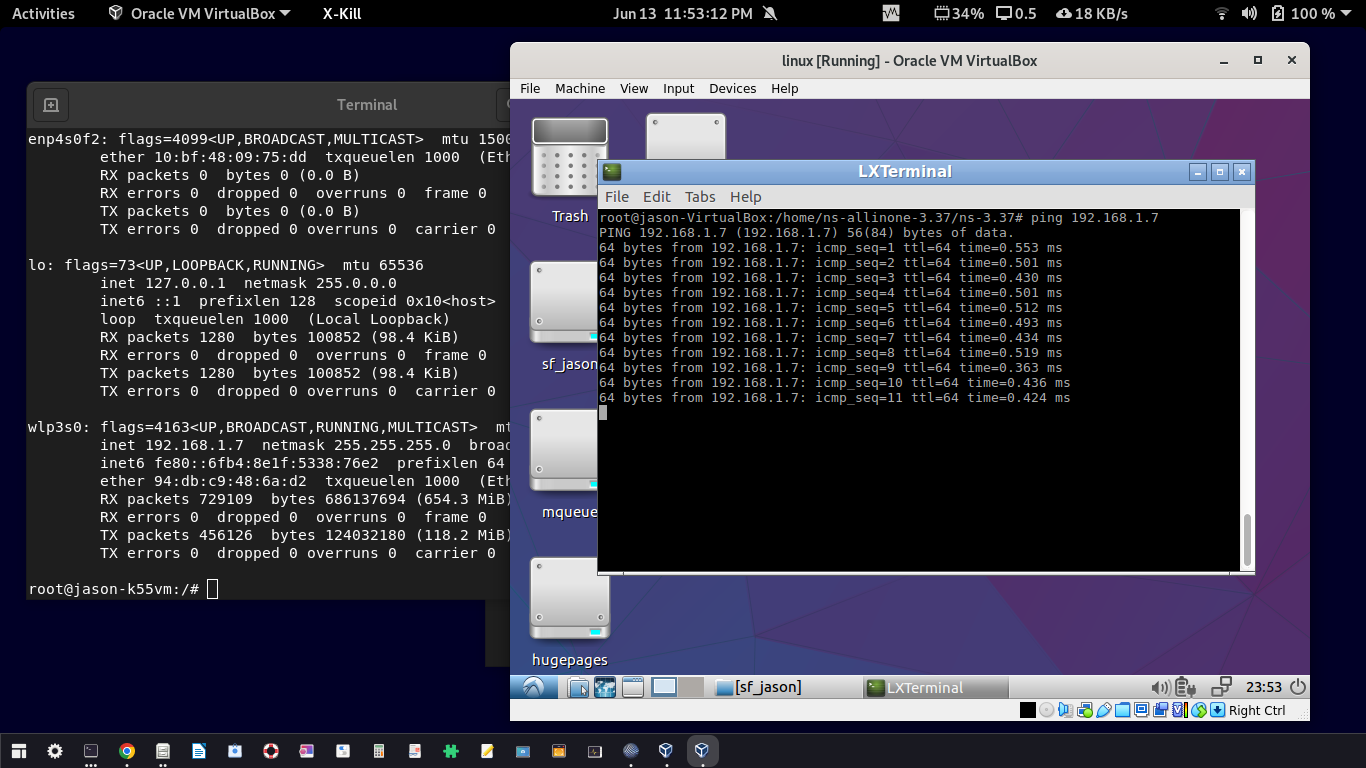
Carefully note the IP address of the Real Host and the virtual Guest in the following screenshot

To make the above things work, we should the following VM Configuration.
The following is the output of experiment that I did after some reboots. Since the IP addresses are dynamically provided through DHCP, at this time, our laptop’s wireless device (which got an IP 192.168.1.8 through DHCP running at the wireless router) was connected to a wireless router (at IP 192.168.1.1 – it is also the Gateway IP Address of the network).
The virtual box guest also got its IP 198.162.1.7 through the DHCP server running at the wifi router.
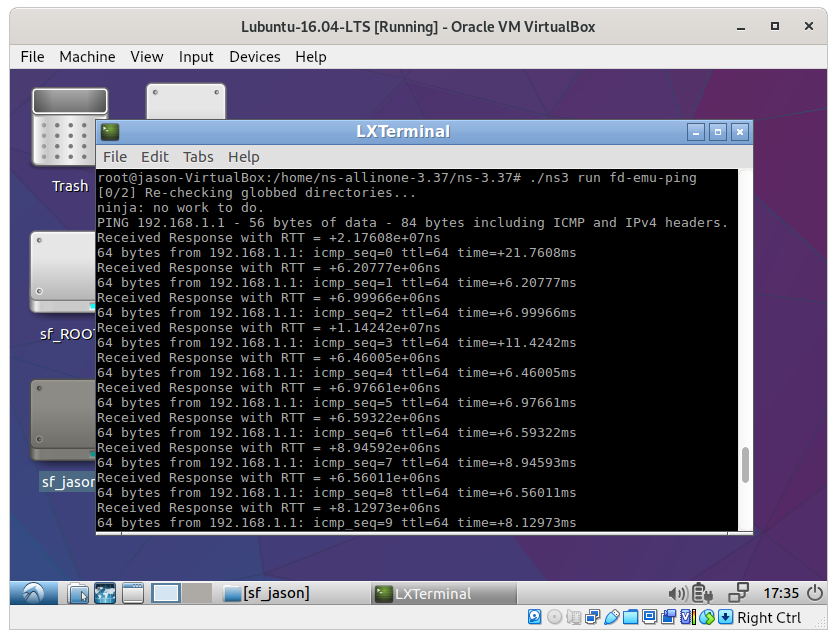
The Ping a Real Local Host from ns-3 Node
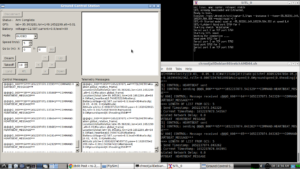
Carefully Note the following Screenshot. In this, a simulated ns-3 node with IP 192.168.1.101 from a simulation that is running on the Virtual Guest (IP 198.162.1.8)trying to ping the real host computer (IP 198.162.1.7) and it was successful.
So, as shown in the following screenshot, a simulated ns-3 node is communicating with a real hardware(the Laptop)
Here, the Virtual Guest is trying to ‘ping’ the Real Host machine and it was successful in reaching the Host.
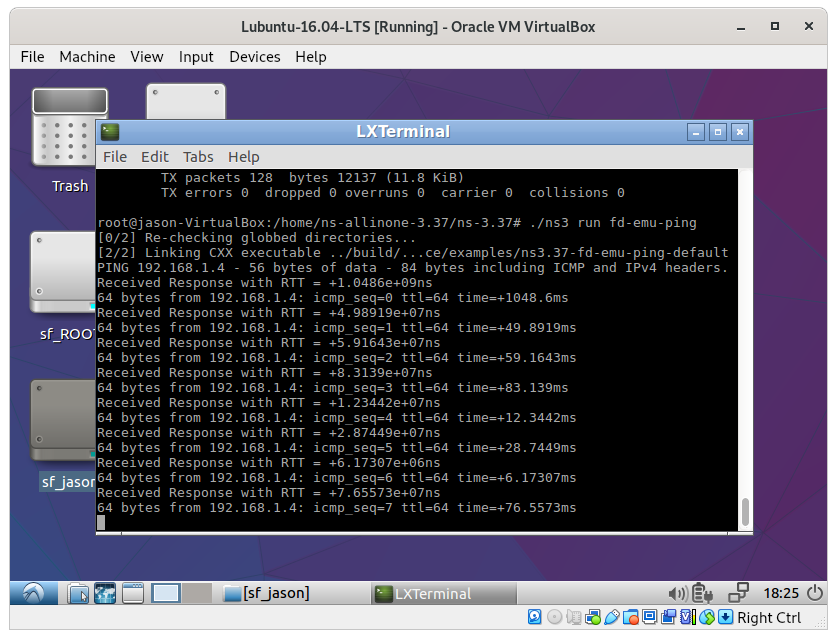
The Ping a Real Remote WiFi Gateway Node from ns-3 Node
Pinging the WiFi Gateway node (the WiFi router in which the laptop is connected and from where the Virtual Machine got its IP through DHCP)
The following is the configuration to make it work:
The Ping a Real Mobile Phone from ns-3 Node
Pinging a Mobile phone (ip 192.168.1.4) which is already connected with the WiFi Gateway node (the WiFi router in which the phone got its IP through DHCP)
The following is the configuration to make it work:
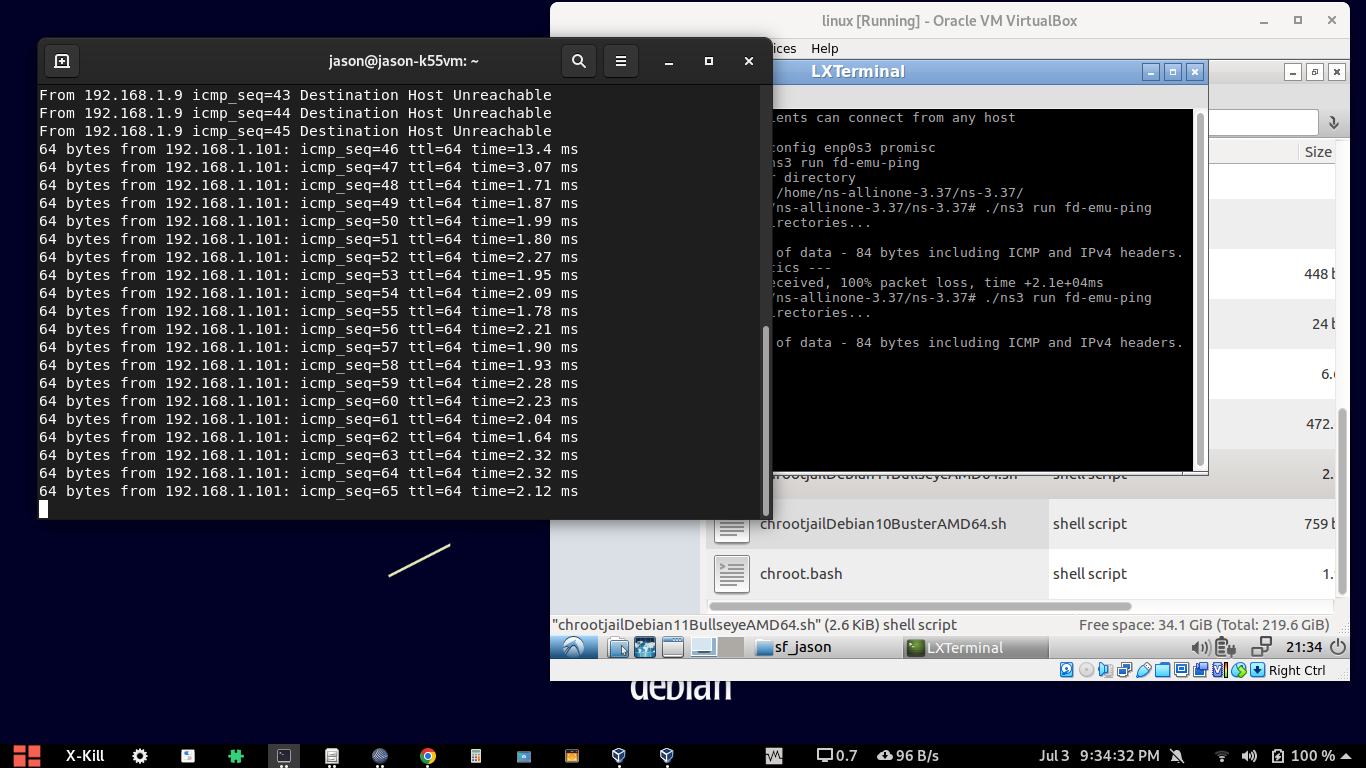
Ping a Simulated ns-3 node From a Real Node
If you carefully notice the left side terminal output, while trying to ping an ns-3 node with IP 192.168.1.101, the local wifi host (IP 192.168.1.9) which is trying to route the ping through a wireless hub, it fails because the virtual ns-3 node is not started at that moment inside VirtualBox. While running the simulation inside the VirtualBox, the simulated ns-3 node with IP 192.168.1.101 was accessible through the router since the router’s IP is the gateway IP of the simulated ns-3 node.
So, immediately after running the simulation, the ns-3 node was accessible. So, now the ping from the real node was abe to reach the simulated node through the wireless gateway. So the terminal window shows the ping reply from the simulated ns-3 node.
Potential of this Idea
Using this idea, it is possible to create a very large network of ns-3 nodes and connect all of them through another simulated gateway node which is connected to very large network of real nodes through a real WiFi gateway node.
It is possible to communicate with tiny, real-world IoT devices such as ESP-8263 WeMosD1 mini or NODEMCU-ESP8263. These boards can be easily configured to form a simple or complex WiFi ad-hoc networks. So, we can make these tiny IoT devices to communicate with an Emulated ns-3 node of a running Network Simulation. This opens boundless possibilities of doing a simulation by incorporating several real as well as simulated IoT nodes. The following article explains the way of using these tiny IoT devices.
Using Arduino IDE for doing ESP8266 – WeMos D1 mini WiFi Projects
Using NODEMCU – ESP8266 Wifi with Arduino IDE for IoT Projects and Experiments.
We may explore that possibility in our future article.
Conclusion
Generally, it is hard(?) to run an ns-3 emulation-related simulation script without active, physical, wired ethernet hardware. In a recent discussion, at[7], Bill Tao provided a way to ping a remote host over a real WiFi Ethernet Device; but bringing a WiFi Ethernet to promiscuous mode may lead to other network issues in the computer where we are running this simulation. So, it is not advisable to use the WiFi Ethernet card of a computer in promiscuous mode.
This article shows the possibility to run such ns-3 emulation-related simulation on a laptop that only has an active WiFi networking device and a way to use it without bringing the networking WiFi device to promiscuous mode. As a proof of concept, we pinged a real local host from an ns-3 node which is running inside a Linux Virtual Box VM node. Further, we successfully pinged the remote gateway node through the local WiFi Ethernet card and successfully pinged a remote mobile phone that was connected to the WiFi Router (Gateway Node/AP Node).
Note: If you carefully note, then you can find that I am running ns-3.37 on Lubuntu 16.04. Mostly, it will be very hard because of the gcc version conflicts and other library conflicts. But, here, we are simply running ns-3.37 on a old Lubuntu 16.04 version because we are using ns-3 inside a Debian 11 chroot environment on Lubuntu 16.04. Yes. it is somewhat complicated – but it will work
+:-( The chroot-based installation of ns-3 is nothing do to with the technique presented in this article – so do not get confused with it – of course, you may already be got confused a lot on the emulation-related ns-3 simulation. The reason I am using a pre-existing image of Lubuntu 16.04 VM and a remotely pre-installed ns-3.37 is because of my laziness in installing a VM with latest Linux Distro which may be much compatible with latest ns-3  :-).
:-).
References
- https://www.nsnam.org/docs/models/html/emulation-overview.html
- https:www.nsnam.org/docs/models/html/fd-net-device.html
- https://www.projectguideline.com/installing-an-old-linux-under-virtualbox-and-using-shared-folders/
- https://www.projectguideline.com/installing-aquasim-aqua3d-on-an-old-linux-under-virtualbox/
- https://www.nsnam.org/docs/release/3.10/manual/html/emu.html#emu-netdevice
- https://groups.google.com/g/ns-3-users/search?q=FdNetDevice
- https://groups.google.com/g/ns-3-users/c/BPTB-7eUHvg/m/PI-p-noRAgAJ
 Take Me to Afarion ns-3 iPlayground