Even though I am not civilized enough to say “wish messages” to people, let me try to deliver a “Happy New Year” wish message to the members of ns-3 user group and the ns-3 developers in an ns-3 way.
Drone Display
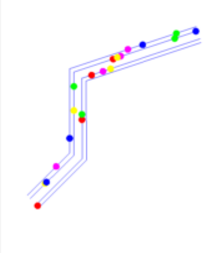
A drone display (also known as a drone show) is the use of multiple unmanned aerial vehicles (drones), often quadcopters, flying in a coordinated fashion for public display. They are usually equipped with LEDs, and the display is held at night[1].
Text2PixelMobilityModel
From ns-2/ns-3’s point of view, we can call this Text2Pixel operation as a custom mobility model called “Text2PixelMobilityModel”. The main idea is to make the nodes of the network to start moving from some random locations and finally move to specific locations to form a test message that will be readable from a distant location.
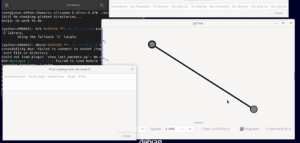
A Python Script for Generating a ns-2 Mobility Trace File
The following is the python script that we developed from the ideas mentioned in [4]. This python script will convert a text message into appropriate node locations and create a mobility scenario file from it. The nodes are started to move from a random location and finally form a text message at the end of the mobility.
The ns-2 Scenario File
$node_(0) set X_ 923.7323548620866
$node_(0) set Y_ 1101.9912700073216
$node_(0) set Z_ 147.80007813756953
$ns_ at 5.0 "$node_(0) setdest 20.878345712592772 130.35210815064582 30.13470204454323 "
$node_(1) set X_ 834.1076881494627
$node_(1) set Y_ 419.9789647479143
$node_(1) set Z_ 8.86865391875694
$ns_ at 5.0 "$node_(1) setdest 60.163002179021134 130.22546808347104 30.442708645691237 "
.....
.....
......
$node_(462) set X_ 79.1687465040182
$node_(462) set Y_ 1138.6632637285923
$node_(462) set Z_ 212.81314851710877
$ns_ at 5.0 "$node_(462) setdest 960.1180377895231 530.6946396183145 30.478139880874593 "
$node_(463) set X_ 821.0020275962395
$node_(463) set Y_ 538.7571666557343
$node_(463) set Z_ 984.8365982727286
$ns_ at 5.0 "$node_(463) setdest 970.0914519685864 530.9110688874141 30.527238418536143 "
## Nodes : 464<
A Simple ns-3 Simulation for Drone Show
The following ns-3 simulation script presents the idea of creating a ‘drone show’ using ns-2 mobility trace file.
#include "ns3/core-module.h"
#include "ns3/mobility-module.h"
#include "ns3/ns2-mobility-helper.h"
#include "ns3/netanim-module.h"

using namespace ns3;

int main (int argc, char *argv[])
{
// Create Ns2MobilityHelper with the specified trace log file as parameter
Ns2MobilityHelper ns2 = Ns2MobilityHelper ("mobility.txt");
// Create Moble nodes.
NodeContainer MobileNodes;
MobileNodes.Create (464);
// configure movements for each node, while reading trace file
ns2.Install ();
AnimationInterface anim ("SimpleNS3DroneShowSimulationWith-ns2-mobility-trace.xml");
Simulator::Stop (Seconds (100));
Simulator::Run ();
return 0;
}
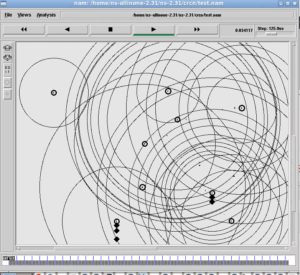
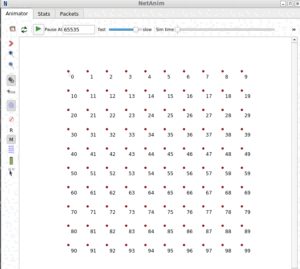
The NetAnim Output
The following is the 2D output of the above ns-3 simulation.
Adding NetSimulyzer 3D output Support
If we add few lines to incorporate NetSimulyzer feature in the above 2D ns-3 simulation, then it will provide 3D output. The following simulation is the modified one.
#include "ns3/core-module.h"
#include "ns3/mobility-module.h"
#include "ns3/ns2-mobility-helper.h"
#include "ns3/netanim-module.h"
#include "ns3/netsimulyzer-module.h"

using namespace ns3;
using namespace netsimulyzer;

int main (int argc, char *argv[])
{
// Create Ns2MobilityHelper with the specified trace log file as parameter
Ns2MobilityHelper ns2 = Ns2MobilityHelper ("mobility.txt");

// Create Moble nodes.
NodeContainer UAV;
UAV.Create (464);

// configure movements for each node, while reading trace file
ns2.Install ();

auto orchestrator = CreateObject ("SimpleNS3DroneShowSimulationWith-ns2-mobility-trace-3D.json");

// Use helper to define model for visualizing nodes and aggregate to Node object
netsimulyzer::NodeConfigurationHelper UAVHelper{orchestrator};
UAVHelper.Set ("Model", netsimulyzer::models::SPHERE_VALUE);
UAVHelper.Set ("BaseColor", netsimulyzer::OptionalValue{netsimulyzer::RED});
UAVHelper.Set ("Scale", DoubleValue (2));
UAVHelper.Install(UAV);

AnimationInterface anim ("SimpleNS3DroneShowSimulationWith-ns2-mobility-trace-3D.xml");

Simulator::Stop (Seconds (100));
Simulator::Run ();
Simulator::Destroy ();
return 0;
}
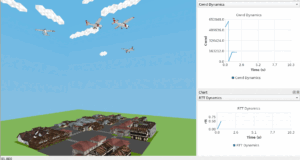
The NetSimulyzer 3D Output
The following is the 3D output of the above ns-3 simulation visualized under NetSimulyzer.
![]()

![]()

Conclusion
References
- https://en.wikipedia.org/wiki/Drone_display
- Using ns-2 Mobility Traces in ns-3 Simulation – A Simplified Example
- ns-3 VANET Simulation – 3D Visualization of 2D Gridway Mobility using NetSimulyzer
- Generate pixel matrices from characters in string
 Take Me to Afarion ns-3 iPlayground