Even though the latest Linux distributions are user-friendly, students and scholars tend to use Windows since they are only familiar with Windows operating system and will find it difficult to install Linux natively for doing their research simulations. Further, often they mistakenly crash their Windows machine while trying to dual-boot the system with Linux. and that may lead to severe data loss.
There are different ways to use a Linux application on windows. The popular methods are:
- Using Cygwin Environment
- Using MinGW/MinGW-64 Environment
- Using MSYS2 Environment
- Using Virtual Machines such as VirtualBox
- Using Windows Subsystem for Linux
Compiling the latest Linux-based applications/simulation tools such as ns-3 and OMNet++ using the first three methods (Cygwin, MinGW and MSYS2) will be a challenging task. Of course, some people successfully made it work but the rest of the people may fail to make it work because of various reasons.
But, using different virtualisation solutions such as Microsoft Virtual PC, Microsoft Hyper-V, VMWare, VirtualBox, Windows Subsystem for Linux etc., one can successfully install and use any Linux-based application under Windows. Among these, Windows Subsystem for Linux is the best and most efficient way of running a Linux-based application under Windows.
The Windows Subsystem for Linux (WSL)
The Windows Subsystem for Linux (WSL) lets developers run a GNU/Linux environment — including most command-line tools, utilities, and applications — directly on Windows, unmodified, without the overhead of a traditional virtual machine or dual-boot setup[1]. Particularly, by using the latest version of WSL2 under Windows 11 one can effortlessly run any Linux-based application including GUI applications under Windows 11.
Using WSL2, can install
(1) ns-2 and nam under Windows 11
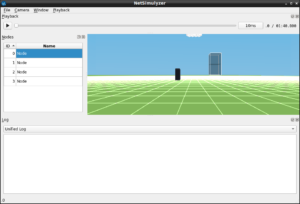
(2) ns-3, NetAnim and NetSimulyzer under Windows 11
(3) OMNet++ with IDE under Windows 11
(4) SUMO with sumo-gui under Windows 11
There are countless possibilities for using WSL2 for a Linux-based research
Installing WSL2 Under Windows 11
One may find a detailed installation procedure for installing WSL2 under Windows 11 and using GUI based Linux application in[2]
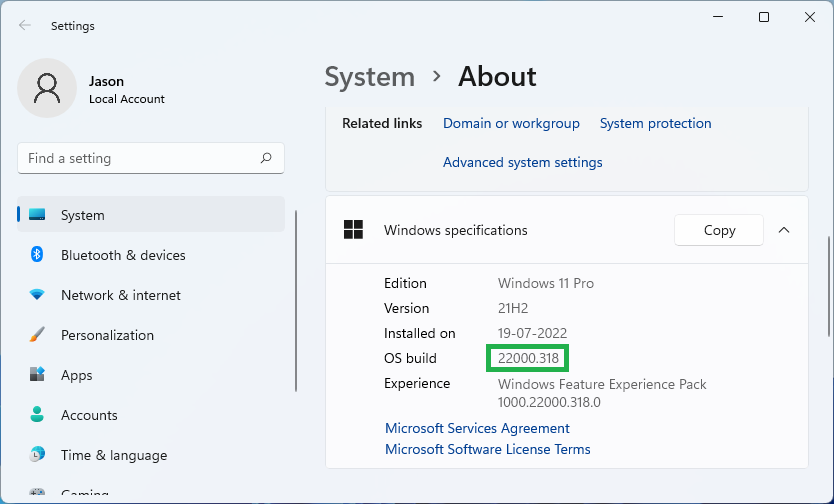
Step 1: Check the Windows ll Version
For running WSL2 with Linux GUI application support, we should use a suitable version of Windows 11. The OS build number of the Windows 11 must be higher than 22000. You may check it in System->About->Windows specifications section
Step 2: Enable the Windows features “Virtual Machine Platform”
Open the “Turn Windows features on or off” window and enable the “Virtual Machine Platform” feature
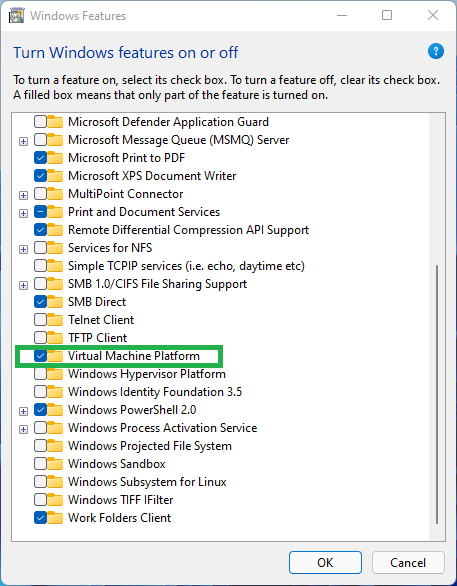
Now we can install WSL2 support and suitable a Linux in it
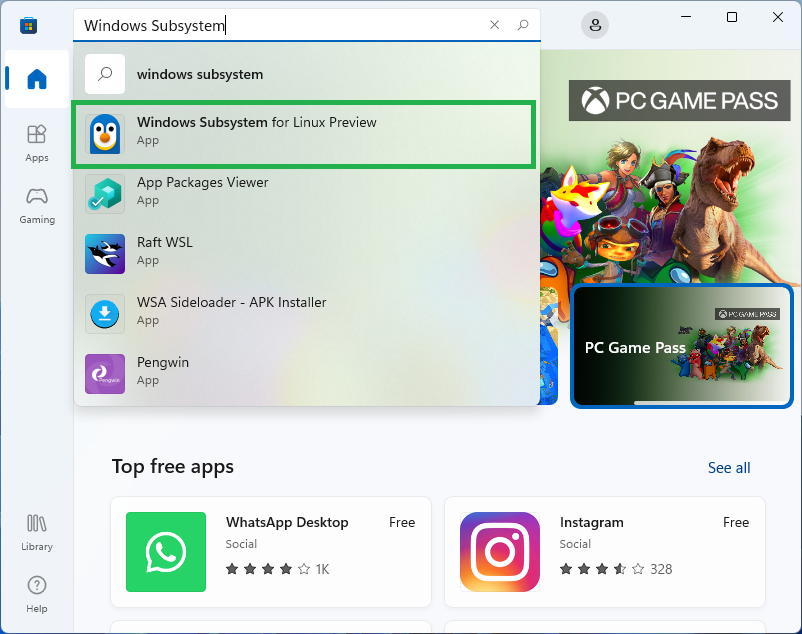
Step 3: Install Windows Subsystem for Linux Preview
We can install “Windows Subsystem for Linux Preview” from the Microsoft Store. We may search for it in the search box and can find it and install it from here.
In fact, this preview version of WSL2 only supports running the Linux GUI application out of the box without any additional Xserver component. (it means, the X-server components are already buit-in with this WSL2 package)
After the successful installation of “Windows Subsystem for Linux Preview” , we can run the command ‘wsl’ from the “Windows PowerShell” – but it will not contain the Linux system installed in it. So, before running ‘wsl’ command, we have to install a suitable version of Linux from the Microsoft Store.
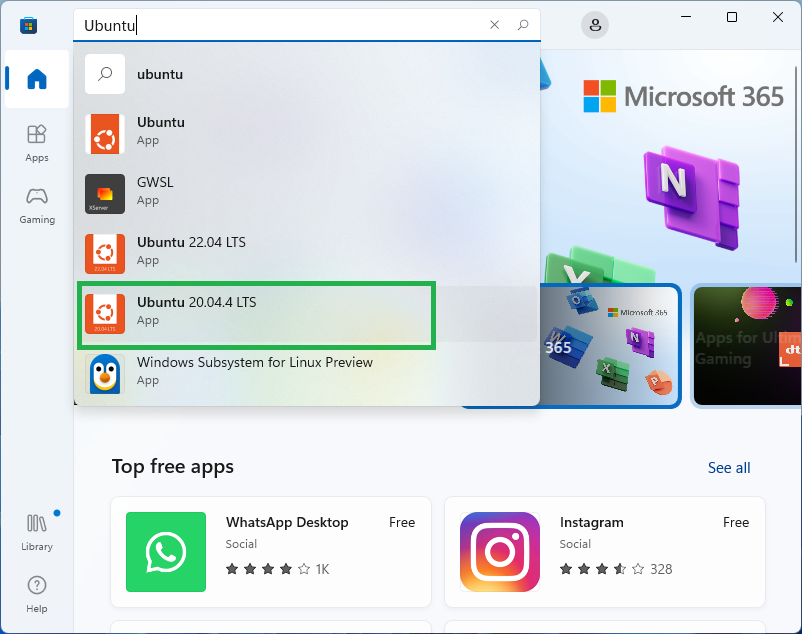
Step 4: Installing a Suitable Linux version from Microsoft Store.
We can install a suitable version of “Ubuntu” from the Microsoft Store. We may search for it in the search box and can find it and install it. Here we are installing Ubuntu 20.04.4 LTS version.
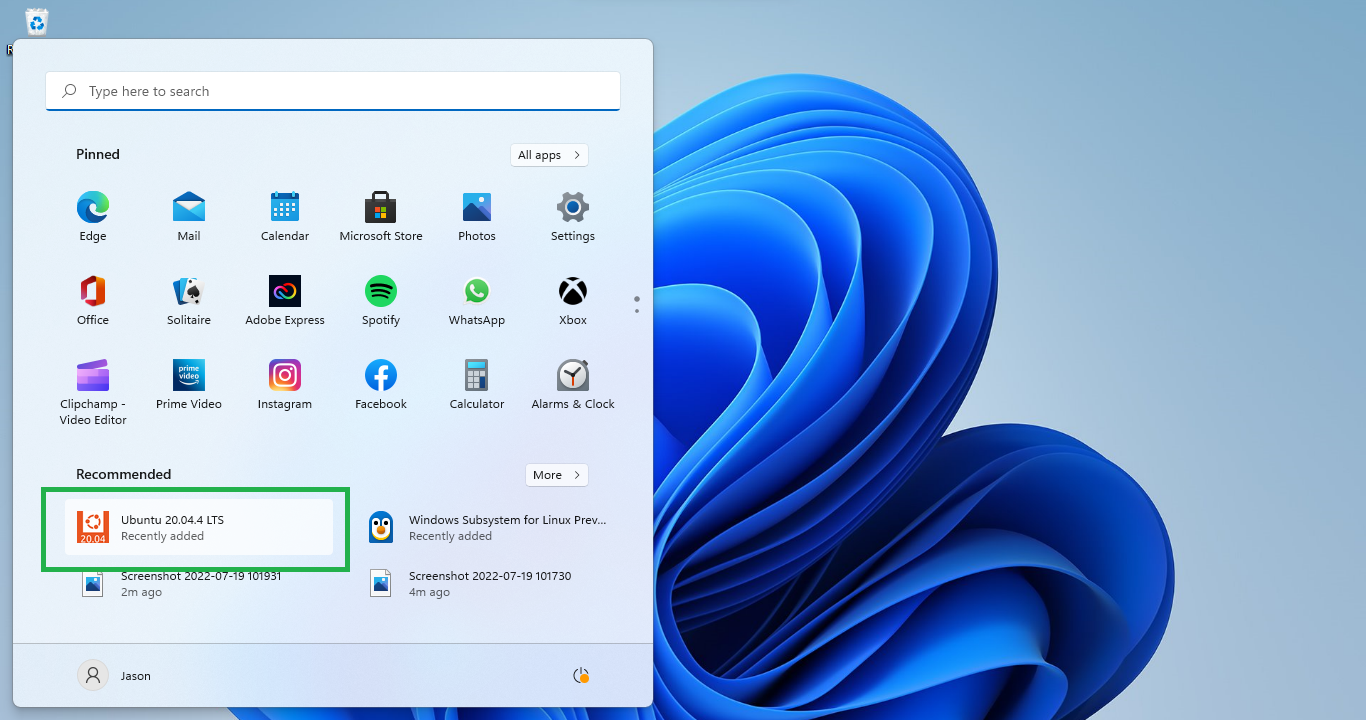
Step 5: Running Ubuntu
Now we can run the newly installed Ubuntu from the menu itself.
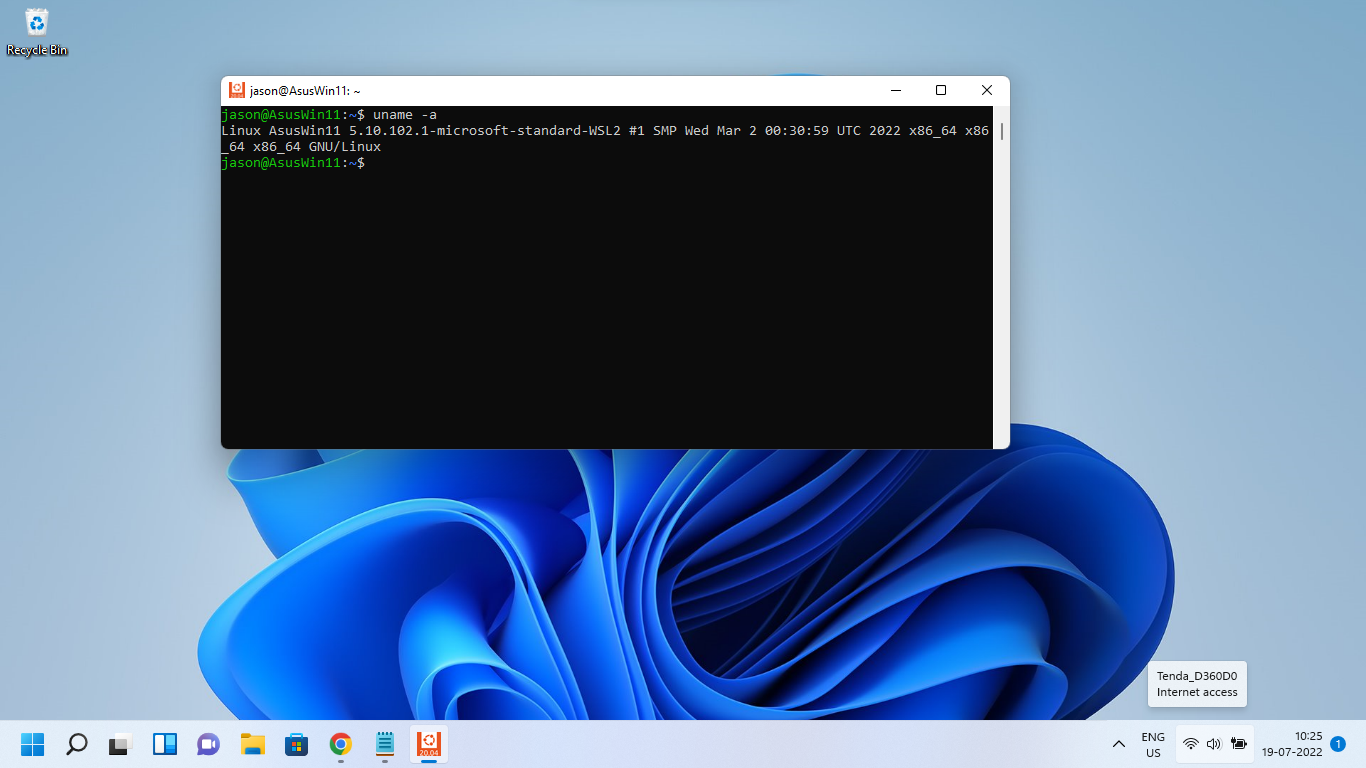
During the first run, it will ask and set a Linux user name and password. After that, it will directly run the terminal without asking username/password.
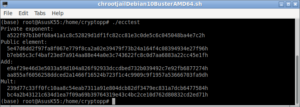
The following output shows the Ubuntu Terminal window which is running on WSL2. Here we may run any text-based and GUI-based Linux commands and applications.
Step 6: Installing some x11-based applications
On the latest Windows 11, WSL2 comes with WSLg (the graphical support) enabled by default. WSLg allows you to run graphical linux applications. So, now we can install some simple x11-based GUI applications and test the working of Linux GUI applications on Windows 11.
First, update the Ubuntu package repository.
(After that, if necessary, we can upgrade the entire system with the latest modifications)
Now, to test the GUI application support, we can install some basic X11 applications as follows:
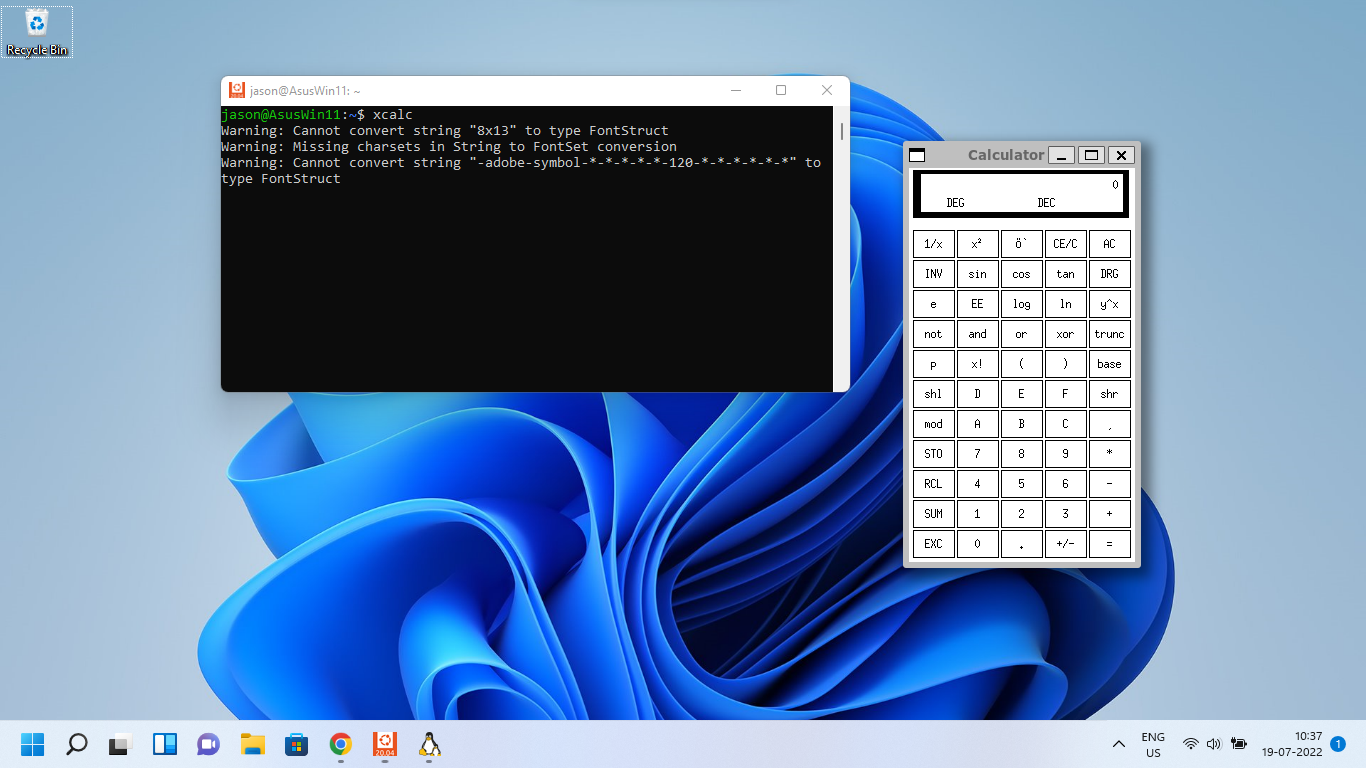
Step 6: Running a sample GUI application
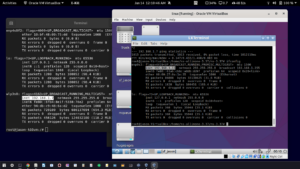
In the following example, we are running a Linux GUI application called “xcalc”. If you notice that, the new Linux GUI application which is running under WSL2 Linux environment is getting displaying its “window” on the host (Windows 11) desktop itself
Conclusion
With the latest Windows 11 and its WSL2 support, we can run any GUI-based Linux applications under windows. The future version of WSL may even have excellent support for applications that may use 3D graphics subsystem.
Now we can install any text-based as well as GUI-based Linux application under this Ubuntu which is running under WSL2. So, now it is possible to install ns-3 with ‘NetAnim‘ (GUI) or ns-2 with the ‘nam‘ (GUI) OMNet++ with its ‘IDE’ (GUI), SUMO (GUI).
Note : But, you can not get good performance in terms of speed if you are comparing it with a native Linux installation on the same hardware. Even WSL may perform poor than some other virtualization solutions such as Virtual box (where it is possible to use a minimal, stripped version of Linux for better performance). So, if you are going to do some serious research work, I will advice using a simulator such as ns-3, only under a native Linux operating system and on native hardware.
The following Procedure explains the installation of ns-3 and NetAnim Under Windows 11 with WSL2 :
The following Procedure explains the installation of OMNet++ IDE Under Windows 11 with WSL2 :
Installing OMNet++ IDE Under new Windows11 Version Using WSL
Meantime, one may try the following installation procedures under WSL2.
https://www.projectguideline.com/installing-aquasim-aqua3d-on-an-old-linux-under-virtualbox/
Installing Aquasim & Aqua3D on an old Linux under VirtualBox
 Take Me to Afarion ns-3 iPlayground