Introduction to “ms-van3t”.
“ms-van3t” is a Multi-Stack VANET Framework module developed for ns-3.
This module can be used to build and simulate ETSI-compliant VANET (V2X) applications using SUMO and ns-3[1].
As per its documentation, ms-van3t currently supports two stacks/communication technologies for V2I/V2N:
- 802.11p, communicating, for instance, with a Road-Side Unit
- LTE, for V2N communications
The ms-van3t team confirms the existence of the following features in this ns-3 extension.
- 802.11p, LTE and C-V2X access technology models
- Emulation mode through fd-net-devices
- Possibility of removing SUMO from the loop and using real GPS trace to manage mobility
- A couple of applications to showcase and explain how to use the framework in V2I and V2V scenarios
Further, they outlined some of the possibilities of integrating existing modules of ns3 with their extension.
The most interesting aspect of this module is: It can interact with SUMO from an ns-3 simulation using the standard “TraCI” interface(“Traffic Control Interface”) of SUMO. So that, it is possible to create VANET nodes dynamically by reading the events of SUMO configuration file during the run of the ns-3 simulation. Even the simulated traffic aspects and the simulated SUMO vehicles can be controlled from the running ns-3 simulation.
Installation Requirements
SUMO Versions : v1.6.0, v1.7.0, v1.8.0
ns-3 Version: : v3.33
Prefered OS Versions : Ubuntu 18.04 to 20.04. (64 bit version – important)
About this Installation
Of course, the actual installation procedure given by the original authors of ms-van3t is a good one. In fact, it is the “git” way of cloning a project. But I feel that procedure as a difficult one (even though it will do it automatically by an installation build script)
So, in this article, I am going to demonstrate a custom procedure for installing ms-van3t on a 64 bit Debian 10 (Buster) host under “chroot jail”. Before starting to explain the actual procedure, I hereby present some of my failures with my earlier installations. This will give the reason why I avoided the original ‘sandbox build’ procedure of the authors. This will help others who may be facing the same issues.
Those who do not know the way of installing ns-3 under “chroot jail” may read the following articles to understand the power and freedom of doing ns-3 simulations under “chroot jail” :
Installing ns3.35 in Debian 10 chroot Jail Under Debian 11 Host OS or any Version of Linux Host
The Issues with chroot jail Installation of ms-van3t:
Failiure 1:
The very first failure was due to the peculiar way in which the original installation is done. The standard way of installing “ms-van3t” is generally done through its installation script “sandbox_builder.sh“. But that script will not run with “root” privilege.
echo “Please do NOT run this script as root.”
exit 1
fi
Even if we disable this by commenting the above lines of the installation script, it will again fail at lines where “sudo” is called(since chroot jail will not have sudo). The installation failed even if we remove all “sudo” strings from the commands. I didn’t experiment with it further; because I decided to install it in a “plain old” and “easy” manual way.
Failure 2:
I will explain my own custom way of installing ms-van3t in the next section. Before that, I am going to explain another failure on 32 bit OS.
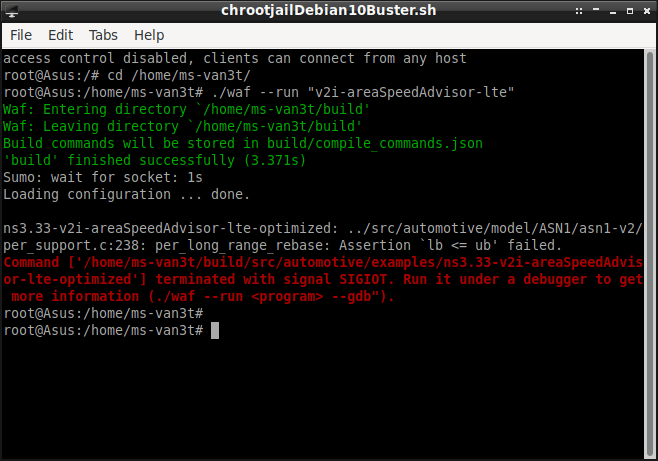
In fact, in my earlier attempt of installing it, there was a problem even after a “successful install” of ms-van3t in a 32 bit Debian 10 (Buster) host under “chroot jail”. After successful install, if we try to run a simulation with ns-3-SUMO interaction feature, then the simulation successfully starts to run with opening SUMO GUI …….
But, immediately, the simulation will get terminated with the following error:
The Procedure for Installing ‘ms-van3t’ on 64 bit Debian 10 (Buster) in a ‘chroot jail’
This installation is simple and “plain old way”.
First, we may install SUMO which is needed for some ms-van3t simulations
Part – I. The SUMO Installation
Since the default version of SUMO that will be installed from Debian 10 repositories will be an old one, I decided to compile the latest version from the source.
Step 1: Install the Dependencies for SUMO
Step 2: Download the source version of SUMO
Download SUMO version v1.6.0 or v1.7.0 or v1.8.0 .
(SUMO that will be installed from default Debian 10 repositories will be an older one)
So, I decided to compile a suitable version from the source.
Caution: The command “git clone –recursive https://github.com/eclipse/sumo” may download a version greater than v1.8.0 in future. So you may avoid it.
One can download the SUMO version of their choice from https://sourceforge.net/projects/sumo/files/sumo/
Or simply you may download and use the following version
Step 3: Compile SUMO
After downloading sumo, extract it in a folder under your home directory. In my chroot jail install, I am keeping it under /home folder.
For compiling SUMO, do the following:
$ mkdir ./cmakebuild
$ cd cmakebuild
$ cmake ../.
$ make
Part – II. The ns-3 Installation with ms-van3t
For this, we will need only ns-3.33 (In fact, the whole package ns-allinone-3.33 is not at all required). So download only ns-3.33 or the full ns-allinone-3.33 package from the repository.
Step 1: Install Dependencies of ns-3
We may need the following minimum requirements for C++ users. (In fact, the SUMO dependency install itself already installed these two components). You may install any other things that you may need (for example, in case if you wish to install NetAnim for future use)
Step 2: Download ns-3.33
Download ns-3.33 from the following link. (here we are downloading the full ns-allinone-3.33 package )
$ cd /home
$ wget https://www.nsnam.org/releases/ns-allinone-3.33.tar.bz2
#extract the compressed file using your own method
Step 3: Download ms-van3t
Download ms-van3t.
$ git clone https://github.com/marcomali/ms-van3t
Step 4: Copy all the modules of ms-van3t into ns-3.33 ‘src’ folder
Step 5: Compile ns-3 with ms-van3t
It will take a long time to compile ns-3 with ms-van3t.
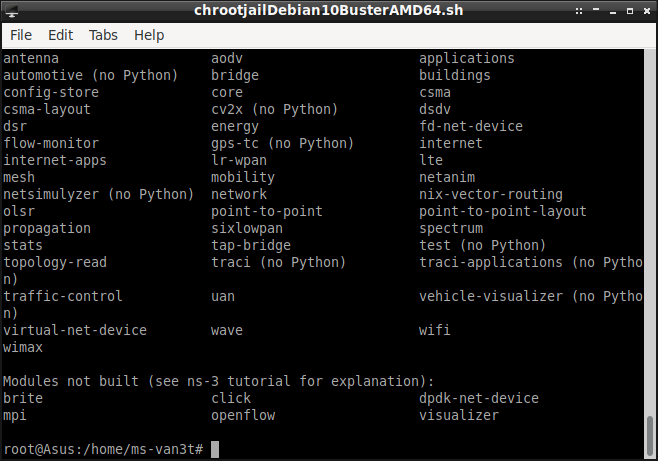
On successful install, you will get a screen similar to the following. (here, in my install I am having few more additional modules that I am using for some other projects).
You may notice the modules
- cv2x,
- gps-tc,
- traci-applications,
- traci
- and vehicle-visualizer
which are the core extensions of the ms-van3t.
Step 5 (Optional): Installation of NetAnim
$ cd /home/ns-allinone-3.35/netanim-3.108
#configure make file using qmake
$ .qmake NetAnim.pro
The above command will create the Makefile for the compilation of NetAnim.
$ make -j9
# the option -j9 is for compile using multiple CPU jobs
Testing the working of ms-van3t
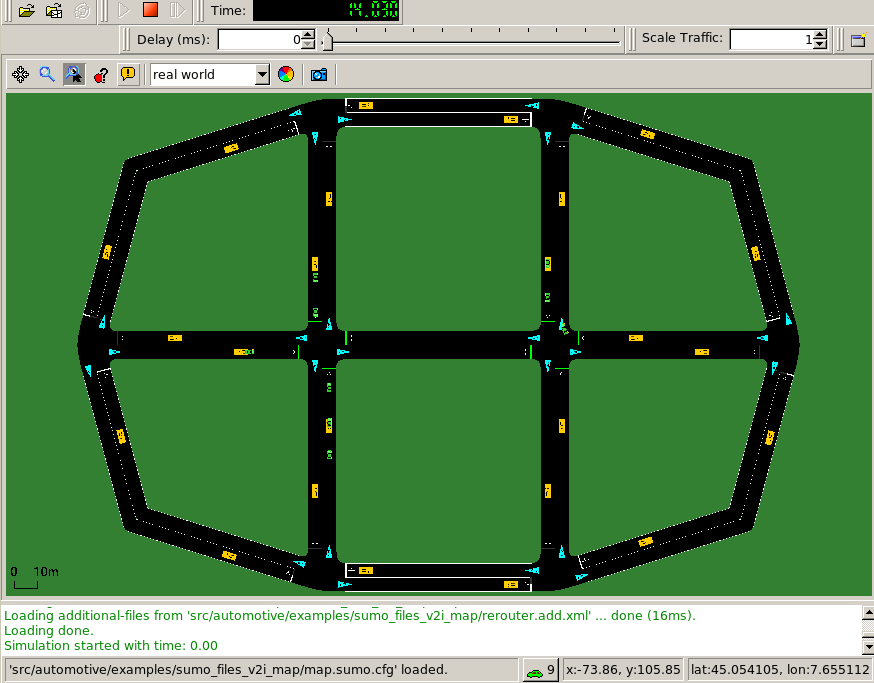
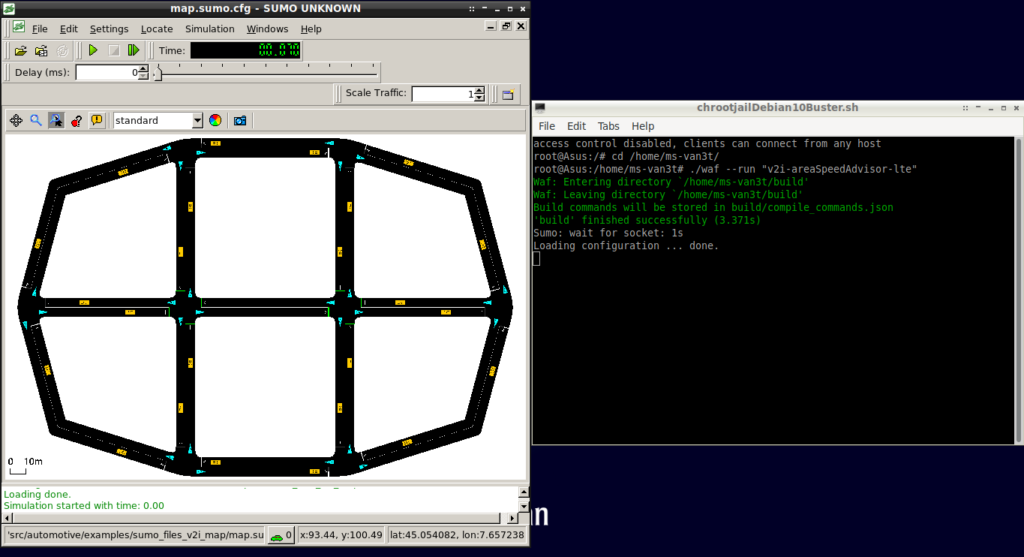
$ ./waf –run “v2i-areaSpeedAdvisor-lte”
The above command will run a lte based VANET simulation and will automatically open the SUMO GUI and start interacting with it.
References:
- https://github.com/marcomali/ms-van3t
- Malinverno, Marco and Raviglione, Francesco and Casetti, Claudio and Chiasserini, Carla-Fabiana and Mangues-Bafalluy, Josep and Requena-Esteso, Manuel, “A Multi-Stack Simulation Framework for Vehicular Applications Testing”, DIVANet ’20, Proceedings of the 10th ACM Symposium on Design and Analysis of Intelligent Vehicular Networks and Applications, 2020, https://doi.org/10.1145/3416014.3424603
 Take Me to Afarion ns-3 iPlayground